
Version : 14/02/2013
Here is a new version of SRAM extension for the AVNET Xilinx Spartan-3A Evaluation Kit (Réf : AES-SP3A-EVAL400G) .
All the necessary files to build your own are included into the attached file.
Have fun !
Buzz
Version : 14/02/2013
Here is a new version of SRAM extension for the AVNET Xilinx Spartan-3A Evaluation Kit (Réf : AES-SP3A-EVAL400G) .
All the necessary files to build your own are included into the attached file.
Have fun !
Buzz

This adaptor acts as a RS232 level translator and provides a 5V voltage to connect some small devices.
All the needed files are included in the attached file:
PSP2Serial.sch : Schematics (Eagle 5.0.0)
PSP2Serial.brd : PCB (Eagle 5.0.0)
PSP2Serial-Pcb-lower.png : 600dpi 'Solder layer' (lower side)
PSP2Serial-Pcb.png : 600dpi full board
PSP2Serial-Pcb-Sch.png : 150dpi schematics
Usage
Just connect the board to the audio PSP port and the sub-9 connector to a RS232 device.
Enjoy !
Buzz

Files
A2600-ROM.sch : Schematics (Eagle 5.0.0)
A2600-ROM.brd : PCB (Eagle 5.0.0)
Usage
Just 'flash' four 8ko files to the UVProm and plug-in the cartridge into the console.
JP1 :
S1 : 1 & 2 : Used to select a 8K portion of a 32K ROM (4 slots)
The attached package contains all you need to build your own cartridge.
Enjoy !
Buzz

This board is made to be used with one ColecoVision ROM file (up to 16Ko).
For the moment, only one file can be stored to the EProm (no bank switching or bank selection).
The attached package contains the schematics and PCB file (Eagle 5.0).
Usage
Just 'flash' one 2Ko, 4Ko, 8K or 16Ko files to the UVProm and plug-in the cartridge into the console.
Enjoy !
Buzz
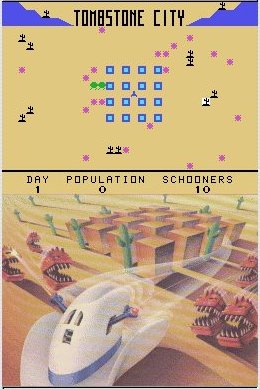
Warning : The music is pretty lound & noisy. I need to understand why ...
What's that
Tombstone city is a game developped in 1981 by Texas Instrusment for the TI99/A4. (see [http://www.videogamehouse.net/tombstone.html] or [http://en.wikipedia.org/wiki/Tombstone_City:_21st_Century]).
This game corresponds to my own implementation of the original game, ready to run on a Nintendo NDS.
The main used tools are:
What's new
Now integrates music and sounds.
Installation
To be able to run this homebrew, you need a linker such as R4, M3, ...
So, copy the TombstoneDS/bin/TombstoneDS.nds binary somewhere in its memory card and run it !
Keys
The attached package contains source code and the binary.
Enjoy !
Buzz

The IRDAJoy is the ultimate interface used to connect your old-school
atari joystick and/or paddles to your PSP handheld console.
The communication between the console and the box is made through an IR link.
Originaly, this interface has been made with a PIC18 microcontroller.
Because it is too much complicated to build, my good friend ZX asked me
to build a new version with something easier to do.
So, here is the same interface, based on an arduino board.
What you need
How to build
I did select the boarduino board because it is not expensive, small and fully compatible with other arduino boards.
To get complete infos, follow the link : http://www.ladyada.net/make/boardui...
Because there is a USB and a serial version, you will probably need a USB-TTL adaptor to program the arduino.
The schematic is very simple. No need to make a real PCB. A prototyping board is nice to use.
You just have to plug wires in the corresponding holes like in the picture.
When wiring is done, open the IrdaJoyArduino.pde file with Arduino
0017 IDE, connect the board to the PC (through a USB-TTL converter if
you purchased the boarduino serial version or directly if you get the
USB version) then click on the upload button.
The code is compiled and then automaticaly uploaded to the boarduino
target. If everything is OK, just put everything into a small box and
use it !
This adaptor is compatible with ZX PSP homebrews. Have a look at : http://zx81.zx81.free.fr/serendipit...
Enjoy !
Buzz

This simple hack corresponds to an "easy-to-make" joystick to USB adaptor.
It is mainly usefull for anybody who wants to play old-school games with their old Atari joysticks on a modern PC or may be on a handheld console like the Caanoo
It is very easy to make and of course, you do not need to make a PCB or buy expensive parts.
The idea: re-use an old USB keyboard to make things happen. Connect your joystick and plug the USB to the PC.
You have to launch your favorite emulator and define the corresponding keys.
Key mapping
Attached package contains every needed information to make your own.
Enjoy !
Buzz
Version: 25/04/2024 This application, recently installed in my NISSAN Patrol, can display: Speed, Cap, Altitude, Time and Date. It is based ...


