Version: 25/04/2024
This application, recently installed in my NISSAN Patrol, can display:
- Speed,
- Cap,
- Altitude,
- Time and Date.
It is based on the following hardware:
- ESP32 (Lolin) board,
- SSD132 LCD Display,
- NEO-6M GPS module.
Have fun !
Buzz
This application, recently installed in my NISSAN Patrol, can display:
It is based on the following hardware:
Have fun !
Buzz

Expansion shield for Arduino UNO
Version : 14/04/2023
This little board and the source code are part of a CS Bomb-like project to be used in Air-Soft games.
In some situations, the Arduino UNO does not have enough IO ports or you you want to keep some of them free.
This shield adds 16 outputs and 16 inputs. To control them, only 6 wires are needed:
KEY_CLK: Clock to shift the value to QH (positive edge)
KEY_LATCH: Capture the 16 inputs (active low)
KEY_DATA: Serialised data (Q7 first, Q0 last)
LED_CLK: Clock to shift the value from SER (positive edge)
LED_LATCH: Set the 16 output bits
LED_DATA: Serialised data (Q7 first, Q0 last)
Two source files are provided as example.
Outputs.cpp / Outputs.h
Inputs.cpp / Inputs.h
You could have a look the main.cpp file (pseudo main).
A README.txt contains basic instructions to use inputs and outputs.
Have fun !
Buzz

Updated : 07/04/2023
Coleco ROM Builder is a Windows application to easily build ROM files for the 31-in-1 & 63-in-1 cartridges.
My best friend ZX-81 has made the hard work already : creating the
loader and providing the scripts and tools to let you create your own
best-games compilation.
You just need some efforts, knowledge and spare time to be able to create the files.
So, I recently decided to create a click-and-go application to perform the same task without any headache.
Note
For the 63-in-1 cartridge, rom_1.bin must be placed in the IC3 socket and rom_2.bin must be placed in IC5 socket.
Have fun !
Buzz

The 31-in-1 is a multicart board for the Colecovision (SMD).
It is made to handle 31 rom files stored in a single UVPROM.
The UVPROM (IC3) should contain 31 images (32KB max) and the specific loader.
Running the bootloader lets you choose a rom image between 31 images, switches to the corresponding memory bank and launches the image.
Usage
Concatenate 31 image files (32KB max) then the loader to get a 1M byte file then burn it to the IC3 chip.
Plug the cartridge in the dedicated slot. Components MUST be in front of you !
Power-on the console.
Part list
IC1 : 74HC574
IC2 : 74HC21
IC3 : 27C080 ou 27C801
IC4 : 74HC688DW
The package containing the PCB files (SMD) is available here: Colecovision-31in1-2023.zip
The 31-in-1 cartridge exists in DIP packages ! It is available here: Colecovision-31in1-DIP-2023.zip
The bootloader can be found here: 31-in-1 loader
Many thanks to my friend ZX (http://zx81.zx81.free.fr) for his help and his very great bootloader !
A simple application has been developed to easily create your ROM files. It is available here
Enjoy !
Buzz


Original version: 28/01/2013
Update: 12/02/2023
The 63-in-1 is a multicart board for the ColecoVision.
It is made to handle 63 rom files stored in two separate UVPROMs.
The first one (IC3) should contain 32 images (32KB max).
The second one (IC5) should contain 31 images (32KB max) and the specific loader.
Running the bootloader lets you choose a rom image between 63 images, switches to the corresponding memory bank and launches the image.
Usage
Concatenate 32 image files (32KB max) to get a 1M byte file then burn it to the IC3 chip.
Concatenate 31 image files (32KB max) then the loader to get a 1M byte file then burn it to the IC5 chip.
Plug the cartridge in the dedicated slot. Components (IC3, SMD,...) MUST be in front of you !
Power-on the console.
Part list
IC1 : 74HC574
IC2 : 74HC21
IC3 : 27C080 ou 27C801
IC4 : 74HC688DW
IC5 : 27C080 ou 27C801
R1: 10K
Q1: BS170
The package containing the PCB files to build your own cartridge is available here: Colecovision-63in1-2023.zip
The bootloader can be found 63-in1 loader.
Many thanks to my friend ZX (http://zx81.zx81.free.fr) for his help and his very great bootloader !
A simple application has been developed to easily create your ROM files. It is available here
Enjoy !
Buzz

The ZX81 was a nice and cheap home computer from the 80's.
It's quitte impossible to find a real ZX81 today as its price has become unrealistic.
Today, anyone can build its own ZX81 as it is easy to find clones. But, in most cases these remakes uses the real ULA chips.
Alwin Henseler has reimplemented the original ULA design in 2012, based on a Xilinx CPLD.
This implementation was exacly the missing piece of hardware I needed for my own ZX81 clone.
Because there was no PCB, I decided to make it.
So, the ZX81_ULA_PCB.zip contains all the necessary files to create your own ZX81 ULA PCB (schematics, board and gerber files are included).
To program the CPLD, please refer to the package. It contains everything you need and of course the zx81_ula.jed programming file.
Note
I deliver the original ULA implementation package from Alwin Henseler because his website does not exist anymore.
Have fun !
Buzz
This ticket shows the important steps to configure Code::Blocks with Allegro5 support.
Requirements
* Code::Blocks 20.03
* MSYS2 framework
* Allegro 5 (MSYS64 package)
* Windows 10
Code::Blocks tabs
Just add the following lines as in the different screenshots.


Useful links
Allegro tutorial
https://github.com/liballeg/allegro_wiki/wiki/Quickstart
MSYS2
https://www.devdungeon.com/content/install-gcc-compiler-windows-msys2-cc
Code::Blocks
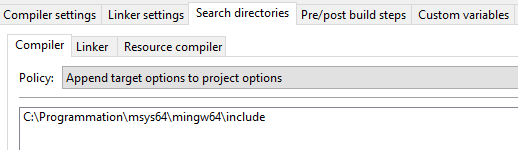
This ticket shows the important steps to configure Code::Blocks with SDL 2 support.
Requirements
* Code::Blocks 20.03
* MSYS2 framework
* SDL 2.0 (MSYS64 package)
* Windows 10
Code::Blocks tabs
Just add the following lines as in the different screenshots.


Useful links
MSYS2
https://www.devdungeon.com/content/install-gcc-compiler-windows-msys2-cc
Code::Blocks

Version: 27/03/2021
This small module is used to easily launch Coleco roms on a RC2014 system.
It is based on a arduino mini associated to a OLED display and a few buttons.
The goal is to communicate with the RC2014 to get the list of files stored on the SDCard
and send the right commands to the target to perform loading.
The only necessary actions from the user point of view is to power on the system, select the file with simple
up & down buttons, then push the load buttons to perform loading.
That's it.
The simple module cannot work alone. A fully configured RC2014 Colecovision system is required.
SN76489 Sound Card for RC2014: https://github.com/jblang/sn76489
TMS9918A Video Card for RC2014: https://github.com/jblang/TMS9918A
Game Controller Board for RC2014: https://github.com/jblang/GameController
z80ctrl for RC2014: https://github.com/jblang/z80ctrl
z80ctrl CPU/RAM/CTC) for RC2014: https://github.com/jblang/z80ctrl (z80ram directory)
SC112 V1.0 Modular backplane: https://smallcomputercentral.wordpress.com/sc112-modular-backplane-rc2014/
All the needed information to build and configure your own Colecovision system is described here:
https://github.com/jblang (z80ctrl & TMS9918A sections).
All RC2014 extra boards are documented here:
https://smallcomputercentral.wordpress.com (Projects & Documentation sections).
* Fully assembled RC2014 Colecovision system (see above)
* Arduino mini Pro 16MHZ/5V
* 128x64 OLED I2C display
* 3x push buttons
* Cable with 6 pin headers.
Connections (described in Control.cpp file) are:
* Buttons
Arduino A0 -> Select button -> GND
Arduino A1 -> DOWN button -> GND
Arduino A2 -> UP button -> GND
* Display
Arduino A4 -> OLED SDA
Arduino A5 -> OLED SCL
OLED GND
Arduino VCC -> OLED VCC (5v)
Arduino GND -> OLED GND
* Z80CTRL (JP5)
1: GND - Arduino GND
3: NC
5: VCC - Arduino VCC
7: RX - Arduino TX
9: TX - Arduino RX
11: AVRRSTn - Arduino DTR
The source code (27/03/2021) is included into this package (src and include directories).
It as been compiled with Visual Studio Code for the Atmega328 16MHz 5V target.
The following libraies are necessary:
Adafruit BusIO
Adafruit GFX Library
Adafruit SS1306
The following picture is showing Dig Dug, running on the RC2014 system (ColecoLauncher is not connected yet. Simple terminal is used instead).

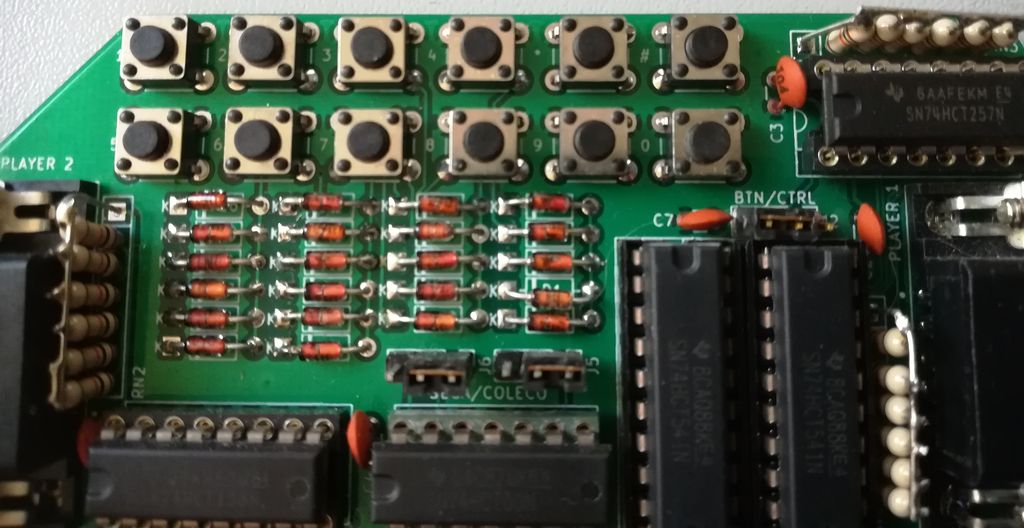
The above picture is showing the connection between the RC2014 system and the ColecoLauncher.



Have fun !
Buzz
Package

Version: 2019/10/20 - Morroco

This new version, like the others, includes the binary and the source code.
How to play
Just launch the binary and play !
Keys
Left, Right, Up, Down keys to move
Q to fire
Enter or Q to play
P to pause the game
Escape to quit
Have fun !
Buzz


Version : 29-04-2017
This is a new version of the Pong console.
If you do not know what it is look at the previous ticket (Pong - Renaissance) or at the following Wikipedia web page https://en.wikipedia.org/wiki/Pong.
This new version is identical to the previous one with a better and smaller PCB.
All the components are the same.
Have fun !
Buzz


Version: 30/09/2014
Few weeks after making the 256-in-1 cartridge, my friend ZX81 and I have decided to do something better.
We have made a new cartridge, containing up to 255 (Atari 2600) games or homebrews
Instead of using micro-switches to select the rom image, a bootloader and associated electronics have been added
The user power-up the console, highlights the game with the joystick and press fire to launch the game
Usage and restrictions
Warning : The bootloader is not included into the package.
Please go to my friend ZX81 web site to get it: http://zx81.zx81.free.fr
Have fun !
Buzz

Here is my ZX81 project : a remake of the famous ZX81 computer, based on the original schematics.
Warning : It has not been tested yet : it should be done in a couple of weeks.
Have fun !

Version 07/05/2014
Few months ago, I finished a new cartridge for the Atari 2600/7800.
This piece of hardware can be seen as a huge cartridge, containing up to 256 (Atari 2600) games or homebrews. Originaly, this board was made just to show something to users during a retro-gaming day (AC 2014). Because I had only one month to do it before the show, I decided to do something very simple and cheap.
Usage and restrictions
Enjoy !
Buzz

Version : 2014-10-13
This arduino sketch has been developped for my bartop project.
Just few words about my it. It is not yet finished but it is composed mainly by :
To manage the buttons, it is necessary to have an interface between buttons/joysticks and the PC in charge of the emulation. There are different solutions to do that.
Instead of re-inventing the wheel, I have chosen the Teensy ([Web site|https://www.pjrc.com/teensy]) as a developpement board. It is arduino compatible but it manages the USB natively. Because I need to manage at least 30 different keys, I have decided to add an input-mutiplexing interface to the Teensy (See IExpender project).
To go back to the sketch, it is very simple. It has been developped with Arduino 1.0.5 IDE to target a Teensy 2.0. Buttons should be connected to the interface (IExpender) according to the mapping table (See code).
Then the interface has to be connected to the Teensy board, and of course the Teensy to the PC
Have fun !
Buzz


Version 30/09/2014
When playing electronics with microcontrollers, you sometimes need to manage a lot of inputs (sensors or buttons).
Instead of using a bigger controller to have more IO ports, it is better or simpler to add extra components to it.
This piece of hardware, based on simple logic chips, uses 10 pins (8 bits for data and 2 bits for control) to manage 32 inputs.
In my case, I need this to connect 32 buttons to an arduino board.
Usage and restrictions
Enjoy !
Buzz

Version: 30/09/2014
A long time ago, I have created a Multicart for the Colecovision.
Now, it is time to do the same for a very nice console : Atari 7800 console.
For the moment, only a prototype has been made and I am still debugging it. I will post the full package when all bugs are fixed.
Keep in touch !
Buzz
Version: 25/04/2024 This application, recently installed in my NISSAN Patrol, can display: Speed, Cap, Altitude, Time and Date. It is based ...